Life has a way of taking us on roller coaster rides where all we have time to do is hang on and wait for the ride to end. Part of the ride we can actually experience the view or the wind whizzing through our hair, but most of our energy is concentrated on hanging on, praying our seat belt is REALLY buckled and staying the car! I cannot believe it's been just about a year since my last post, but it's been one of those rides. I am happily still on the ride of life but in a slower, more intentional mode. Because of this, I have been able to complete a project I have had on my "want to" list for several years. I finally have the time, the energy and the space to complete my project and as of two weeks ago, it is IN!
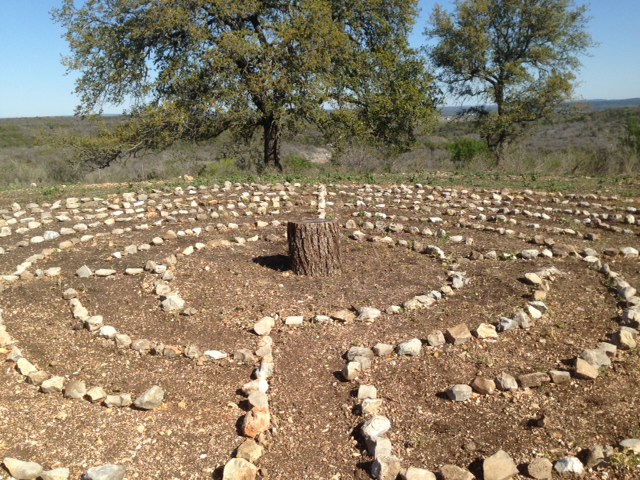
In December, after selling our home of 13 years in June, and moving into a temporary location for four months, we finally moved into our new home. We have some acreage, and one of the things I have wanted to do for about four years is to build a prayer labyrinth on the property. My friend, Linda Knebel, introduced me and took me to walk a prayer labyrinth almost five years ago and I fell in love with this way to connect with God.
What is a prayer labyrinth? How does it work? Here is a basic explanation:
A prayer labyrinth is a simple tool to help you slow down, focus on what is going on INSIDE, surrender and listen for God's voice.
A labyrinth, unlike a maze where you can get lost or stuck in the process, provides one way in to the center and one way out. As you walk inward, you simple empty yourself. Surrender can mean turning over anxiety, grief, sin, anger, fear...anything that is making your heart heavy. Any burden you are shouldering is to be released as you journey inward. Once in the center, as you visualize perhaps being at the foot of the cross, you continue to empty yourself until you feel you have nothing left to leave there. Now, the good part. You retrace your steps out of the labyrinth and JUST LISTEN. Your mind cleared, you are open to God's wisdom.
Many friends I have taken to walk a prayer labyrinth have been a bit leery at first. If this is a new experience for you, embrace the feeling of discomfort and surrender that as well. It is hard for many of us to slow down, sit still and to quiet the chaos in our head, much less to surrender it! The movement and rhythm of walking toward the center, for some, satisfies the need for "doing" and helps them focus on their thoughts because their body is in motion. Without exception, everyone that I have shared the concept of the labyrinth with has left feeling much more peaceful that when they entered.
Labyrinths have been built all over the world and many are open to the public. If you would like to try walking a labyrinth, I have posted a link that will help you see where one is located in your area.
http://labyrinthlocator.com/
It is also fun to find and walk labyrinths as you travel. Keep this in mind as you access the link above and are contemplating any upcoming travel plans.
Life's journey is not always an easy one. There are rocky times, there are fertile timesand there are quiet (what I like to call boring) times. I am grateful that I have been shown the beauty of the prayer labyrinth for each of these seasons of life and now have one to share with others.
I encourage you to seek out a labyrinth in your area and slow down, be still and listen for that quiet small voice that so easily gets lost in today's hustle and bustle of life. It is an intentional decision to slow down and look inward. It's even a little scary sometimes, but it's worth it!
I would love to hear from others about their experiences in walking a labyrinth!
The Little Things That Make Life Great
Thursday, April 4, 2013
Wednesday, April 11, 2012
Gifting iTunes to Make Someone's day!
I have loved music all my life. I have taken piano, guitar, viola, and flute lessons. I danced for twelve years growing up; ballet, tap, jazz...you name it, I danced it. I can remember as a kid listening to mom's 78rph records that played "Backroom Piano" by Ralph Sutton on our HUMONGOUS stereo console and how it transported me around the room as I danced to the fast paced jazz piano music. I can also remember certain events or circumstances when I hear a specific song. Music can take me back to a place, a mood, or a special person almost instantly. Music has the ability to add energy to my workouts, joy to my day, peace to my chaotic moments, and to encourage me through any hard time given the right melodic arrangement and lyrics. Music has been an integral part of my life for as long as I can remember and has made my life richer in SO many ways!
I was telling my sister in law this weekend that I had a new idea for a blog post, about "gifting music" to friends, and then I saw this post on my sister's Facebook Page this morning:
It touched my heart so much and just confirmed that I wanted to share how YOU can easily GIFT a song, or an album to someone and share YOUR energy, joy, peace and encouragement!
Have you ever had a chat with a friend who is down and you JUST heard the perfect song on the radio that you know would make their day and cheer them up? Or been riding with your friend in their convertible with the wind blowing thru your hair on a sunny day and thinking "she would LOVE this song I just downloaded on my workout playlist"? Well, let's get going and I'll show you how to send them some music to make them smile!
First step, you need an itunes account to get this ball rolling. If you have that, you're ready!
Once you are in iTunes, go to the iTunes Store and find the song you are wanting to send to someone...(you will need their email address). (I apologize ahead of time that the pictures, while full screen shots, it's still fairly hard to see details, but you can get the idea!)
I have selected a song by Maroon Five from the Hunger Games Soundtrack...very haunting but beautiful.
Sign in and the next screen will show you what your gift will look like as it arrives to your friend...
Hit BUY GIFT and its on it's way! You will get a confirmation screen immediately after that stating that your gift has been delivered!
I love doing this for friends...it's like a musical greeting card without a postage stamp and two day lag time! Once they receive the music, they can download it onto their computer or their ipod/phone etc...it really is super easy!
You can also gift a custom playlist. I will add those instructions in a separate post.
So, to share with YOU the gift of how to gift music is ALMOST as much fun as sending a song to someone! Let me know what you think about this post and your stories of how music made a difference to someone you shared a special song, album or playlist with!
I was telling my sister in law this weekend that I had a new idea for a blog post, about "gifting music" to friends, and then I saw this post on my sister's Facebook Page this morning:
It touched my heart so much and just confirmed that I wanted to share how YOU can easily GIFT a song, or an album to someone and share YOUR energy, joy, peace and encouragement!
Have you ever had a chat with a friend who is down and you JUST heard the perfect song on the radio that you know would make their day and cheer them up? Or been riding with your friend in their convertible with the wind blowing thru your hair on a sunny day and thinking "she would LOVE this song I just downloaded on my workout playlist"? Well, let's get going and I'll show you how to send them some music to make them smile!
First step, you need an itunes account to get this ball rolling. If you have that, you're ready!
Once you are in iTunes, go to the iTunes Store and find the song you are wanting to send to someone...(you will need their email address). (I apologize ahead of time that the pictures, while full screen shots, it's still fairly hard to see details, but you can get the idea!)
I have selected a song by Maroon Five from the Hunger Games Soundtrack...very haunting but beautiful.
Now that you have found the album and song you want to "gift" go to the right hand side where you see how much the song costs...if you click on the arrow pointing down, you will see you are given several options to choose from, one being "Gift This Song".
You can also gift the entire album by selecting from the Buy album drop down tab on the upper left:
Once you have decided if you are going to gift a song or an album, Select the appropriate option tab and you will see the following screen pop up:
This screen is kind of hard to read, but you will enter in the sender's name (you) and the recipient's name and email with an option to enter a personal message at the end.
Once you hit CONTINUE, it will pop up a screen where you log into your itunes account:
Sign in and the next screen will show you what your gift will look like as it arrives to your friend...
Hit BUY GIFT and its on it's way! You will get a confirmation screen immediately after that stating that your gift has been delivered!
I love doing this for friends...it's like a musical greeting card without a postage stamp and two day lag time! Once they receive the music, they can download it onto their computer or their ipod/phone etc...it really is super easy!
You can also gift a custom playlist. I will add those instructions in a separate post.
So, to share with YOU the gift of how to gift music is ALMOST as much fun as sending a song to someone! Let me know what you think about this post and your stories of how music made a difference to someone you shared a special song, album or playlist with!
Friday, February 17, 2012
Two Great Lip Glosses for Spring!
Ever want a little color but not too much when you're just out running errands or at the gym/workout? I have a couple of favorite lip glosses that I take everywhere with me because they are great used by themselves or on top of a lip color for shine!
The first gloss I LOVE for a very natural lip is called "O-Gloss" by Smashbox. My friend Charlia gave this to me earlier in the fall and now it is one I always have with me!
What I like about this lipgloss is that it "adapts" to your lip tone, or seems too. It never seems too dark, but just adds some "life" to your lips! This is PERFECT for your gym bag if you want to look awake at the gym, but not too made up. It is also a nice balance of moisture, but without the slippery slimy feeling that some glosses give you. Blich!
You can find O-Gloss at Sephora for about $20-$22.00 (which is now located in some JCPenny stores), Nordstrom, Ulta and of course, Amazon. This small tube really seems to last a long time too as you don't need to use much to achieve the natural look your are wanting. The Smashbox website also provides a search engine that helps you find Smashbox retailers near you if you don't have any of these stores in your area.
http://www.smashbox.com/locator/index.tmpl
The second gloss I love is Mary Kay Nourishine. My friend Karla sells Mary Kay and this quickly became one of my "favorite things" as it goes on with some SHEER color, but not a heavy opaque color like lipstick or lipstain. It gives a hint of color that is perfect for the daily activities where you may want a more natural look OR to add to your existing lipstick collection for a pop of shine and shimmer by layering it on top of a more substantial color. http://www.smashbox.com/locator/index.tmpl
I also like the Nourshine line because it comes in a wide variety of colors, so there are a lot of colors to choose from depending on your skin tone and color preferences. I also like the Nourshine line because it, too, is moisturizing without feeling too gooey or sticky. You can order this lip gloss from any Mary Kay consultant for $14.00 a tube. I have also provided the link here (just under the photo) and on my home page of my friend Karla Man's consultant site for easy ordering*. Your lipgloss is shipped directly to you!
Now, I know it's hard to know what colors work for each individual without trying them on. I also know that I have spent lots of money in the store buying $6-$10 lip glosses that I get home and HATE because I couldn't try them on. So if you know someone that sells MK, the best thing to do is experiment and see what the colors look like on you "in person". However, I can give you a couple of my favorite colors and share where I feel they work best.
Soft pinks:
Fancy Nancy and Pink Luster - These are great colors for spring. With the pinks being a strong trend for this upcoming season, you can't go wrong with either of these! I wear both of these alone all the time and love them! They add just the right amount of color for a natural pink overall glow.
Warmer Pink:
Berry Tart - It looks purplish on the color chart, but on lips it reads a soft magenta. If you wear these warmer pink tones you will love this, alone or as a topper.
Orange:
Mango Tango - Another HUGE color trend for the spring! This color is much stronger than the pinks I've tried on, but I love it because it provides some color without giving me ORANGE LIPS!
Bronze:
Cafe Au lait - I love this tone as the months get warmer and we approach the summer months. I do wear sunscreen but tan easily still, so as my skin tone changes in the spring/summer months, I love how this bronze tone accentuates a darker skin tone!
Gold/Silvery White:
Cream and Sugar-this was my favorite "Christmas" gloss to add shimmer to the holiday season and several friends received this for their Christmas goody! For spring, however, this will work great over any lipstick to add shine or shimmer to a base color for the evenings!
Icicle - This is a very light shimmery color that would work well over a base color as well. Too light for me to wear alone, I still like how it works to add sparkle to whatever your base color is!
Spring is the perfect time to try a pop of color..or a new lip gloss to add some color to your day. I hope you'll give one of these a shot and let me know what you think!
(*I am adding Karla's site for easy ordering...I don't get anything from this referral in the way of product or discounts...just want to be clear! )
Monday, February 13, 2012
Making Morning Lattes at Home...It's a Breeze!
Love Starbucks? Don't love so much how much it costs to love your skinny vanilla lattes? Want to be able to stay at home just a little longer on those hurried mornings out the door? I'll share my secret to making the perfect latte while you're at home in your robe and for a fraction of the COST AND a fraction of the CALORIES!
The first thing you need is a standing milk frother. The one I use is the Bonjour Primo Latte milk frother. I will also add that all frothers are not created equal! This is my second Primo Latte frother. My first one I literally wore out a few years ago, then purchased a less expensive model at Bed Bath and Beyond with my coupon (I was so proud!... I love my 20% off) Second frother cost me about $8.00 and I got about $8.00 worth of frothing out of the thing, too, as I quickly had to replace it for another one! So, bottom line, it's worth it to get a $20.00 frother..and with shipping taken care of (Amazon Prime), you save money driving all over town looking for the right model!
This standing frother is available through Amazon for 19.99 (yes, free two day shipping for Amazon Prime members...have I mentioned I love Amazon Prime?). It is a lightweight, battery operated frother and the stand really is nice to have. Its slim design makes it easy to tuck in right next to my coffee pot!
So, let's get to the frothing!
1. Pour a small amount of creamer or half and half into your coffee mug. While I try to steer away from artificial sweeteners, especially aspertame, this is my one splurge! I use International Delight Sugar free vanilla creamer made with Splenda, pouring about three tablespoons per cup of coffee when I make a latte. (It's a bit thicker than the other brands and tends to keep its "froth" better once the coffee is added.) You can heat the creamer in your mug for about 15 seconds, which keeps the coffee hotter for a while, but I usually just pour and go!
The first thing you need is a standing milk frother. The one I use is the Bonjour Primo Latte milk frother. I will also add that all frothers are not created equal! This is my second Primo Latte frother. My first one I literally wore out a few years ago, then purchased a less expensive model at Bed Bath and Beyond with my coupon (I was so proud!... I love my 20% off) Second frother cost me about $8.00 and I got about $8.00 worth of frothing out of the thing, too, as I quickly had to replace it for another one! So, bottom line, it's worth it to get a $20.00 frother..and with shipping taken care of (Amazon Prime), you save money driving all over town looking for the right model!
![]() |
www.amazon.com/BonJour-Automatic-Primo-Latte-Frother/dp/B0000E170W/ref=sr_1_1?ie=UTF8&qid=1329143220&sr=8-1 |
So, let's get to the frothing!
1. Pour a small amount of creamer or half and half into your coffee mug. While I try to steer away from artificial sweeteners, especially aspertame, this is my one splurge! I use International Delight Sugar free vanilla creamer made with Splenda, pouring about three tablespoons per cup of coffee when I make a latte. (It's a bit thicker than the other brands and tends to keep its "froth" better once the coffee is added.) You can heat the creamer in your mug for about 15 seconds, which keeps the coffee hotter for a while, but I usually just pour and go!
2. The next step is to froth the creamer/half and half in the cup until bubbles begin to form. If you use half and half, it is thinner and will not produce "latte" froth. All of the International Delight creamer formulas are thicker, and do this well, so be creative with your flavors. I just prefer the sugar free formulas. I have to admit, though, at Christmas the Peppermint Mocha was deelish...and NOT sugar free!
3. Continue frothing with one hand WHILE YOU POUR the coffee into the mug. This will mix the creamer mixture into the coffee and keep the froth on top!
Your finished product should look like this!
You are ready to sprinkle cinnamon, nutmeg or nothing and curl up in your chair! All without leaving your house AND for about 50 cents a cup!
This little gadget is a GREAT hostess gift if you are traveling and want to take to a friend who is a coffee drinker. It packs easily because it's so small and you can add a bag of coffee to go with it for a nice touch. I have taken these along to friends' homes and they all seem to love them! It also works well for hot chocolate (kids LOVE the whirring of the hot chocolate in the mugs).
Having a few extra minutes at home in the morning without needing to make one more stop along the way AND getting in a delicious latte makes purchasing this frother worth it! Have fun frothing and let me know what you think! CHEERS!
Saturday, February 11, 2012
Put Your Best Face Forward!
A while back, I went in to get my eybrows waxed and Mary, the aesthetician, pointed out that I needed my upper lip waxed. (She was right, by the way...I was Tom Sellick in the making and hadn't even noticed). I agreed and she proceeded to wax my lip and besides childbirth, I'm pretty sure there is no pain comparable! Yikes! Although I was laughing during the process (thanks, mom, for THAT learned behavior!) I was already thinking that there had to be a better way to do this! And to make it worse, I developed these little white bumps that looked like acne around my "mustache" area...GREAT. So I was going for a "cleaner" look and ended up looking like a teenager! Just what I needed on top of my 40's hormonal acne that flares up occasionally. Needless to say, I began my quest to find an alternative to waxing my upper lip and began to look for another form of facial hair remover as an alternative since I did (and still do) need to keep that 'stache from getting out of control!
One tool I discovered is the "Ladyn Fold n' Go Razor". It is WONDERFUL! It was much easier to use for removing the hair on my upper lip without the unsightly white bumps that came afterwards..and without the pain of waxing!
Another use for this little tool is for a mini, at-home, exfoliation/ dermabrasion treatment! It's a lesser known fact that one of the secrets to Japanese skin beauty is that they shave their faces in their culture to maintain their porcelain-like beautiful skin! http://www.asianplasticsurgeryguide.com/news11-1/061102_japanese-female-face-shaving.html
![]() |
Available on Amazon $5.59 for 3 pack, plus $6.00 shipping. http://www.amazon.com/Lady-N-Razor-Folding-Edge/dp/B003JN2ULW/ref=sr_1_2?ie=UTF8&qid=1328979371&sr=8-2 |
It is well known that one of the basics of skin care is exfoliation. Exfoliation is a technique where the layer of mostly dead epidermal cells on the outer surface of the skin is removed to expose fresh living cells. If you take the time to remove that top layer of dead skin from your face, you will see fresher, brighter looking skin and get better better results from your skin care products because they are able to penetrate more effectively!
Dermabrasion is another way to exfoliate your skin. It helps to "refinish" the skin's top layers through a method of controlled surgical scraping. This type of treatment softens the sharp edges of surface irregularities, giving the skin a smoother appearance. While the Ladyn razor is obviously not the quality of what a professional aesthetician uses (ie. "surgical scraping"...thank goodness, since we ARE doing it at HOME!) it works really well for a similar, yet milder, process. I have a friend in Amarillo who IS an RN and aesthetician and when I told her what I had found she said it was a great option for facial exfoliation! Now, I also have another friend who is an aesthetician who prefers to do facials without this process, so it is a personal preference. I'm a believer though!
If you want to use the Fold N Go Razor for the "dermabrasion"/exfoliation for your face just open the blade and hold it at about a 30 degree angle to your jawline and work your way up across your cheek in towards your nose/lip area. You will be AMAZED at how much hair AND dead skin that comes off of your face . You actually hear a crusty sound of that skin as it's removed if you have never done this. You can do this all over your face. Press lightly at first, and be gentle with your skin. Also, go slowly and be gentle so the blade does scratch your skin as you lightly sweep it across different areas of your face. The blade itself is not super sharp, but at certain angles if the blade is not flat against your face, the end of the blade can drag along your skin and cause a slight, but not deep, scratch. I do NOT recommend this as an eyebrow trimmer bc the blade is so big it's harder to get into that small area under your brow, and I'm assuming you don't want to accidentally trim your lashes! It is made for this, I just prefer using the smaller blades for eyebrows.
I only use this razor once every week or every other week, depending on the amount of hair that has grown back onto my face. And, NO, your facial hair does NOT grow back thicker, darker, curlier etc! Whew!
It grows back soft, smooth, and it's natural color...so, don't be afraid to try it. If you don't like seeing that pink healthy glow under your layer of peach fuzz, you just let it grow right back!
Some interesting information about exfoliation*:
The skin undergoes continuous natural exfoliation to some degree. If it didn't, the skin would be inches thick because continuously produced new skin cells would accumulate. Natural exfoliation is more rapid when we are younger. Even some people in their 30-s and 40-s have naturally high cell turnover and may not need to exfoliate regularly. However, many people over thirty develop dull, lifeless looking skin because the topmost layer of skin consisting of these dead skin cells becomes too thick. Also, since exfoliation sometimes reduces the production of skin oil, people with excessively oily skin may benefit too, especially if they exfoliate with beta and/or alpha hydroxy acids. On the other hand, exfoliation may cause further irritation in people with dry and/or sensitive skin, who should either refrain from exfoliation or use mild exfoliants infrequently.
Except for people with extremely oily skin, daily exfoliation is not a good idea. You goal is to remove the dead cells from the skin surface. It takes at least a few days for a sizeable amount of dead cells to accumulate. If you exfoliate more often than that, you may be removing too many living cell, increasing the chance of irritation and skin damage.
For most people who decide to exfoliate, once or twice a week is sufficient. You should determine, based on your skin type, whether once or twice a week is best. If you develop irritation, increased sensitivity or dryness, you are probably exfoliating too much.
*http://www.smartskincare.com/skincarebasics/basicexfoliation.html
At the VERY LEAST this is a great option for home care for upper lip hair removal. If an at home, easy, inexpensive, do-it-yourself mild dermabrasion treatment is something you're interested in, give this a shot!
Thursday, February 9, 2012
Mixing it Up for Valentines Day
I'm trying to "mix up" my blog topics, so today I wanted to share another one of my new "favorite things" which is this KitchenAid Sideswipe beater blade!

If you have and use a 4.5 or 5 quart standing KitchenAid mixer, this is a MUST for your kitchen arsenal. My daughter kendall and I have been baking a lot of cupcakes, cakes and protein cookies lately, and this makes the mixing process so much easier!
So many times with the regular beater, I have to stop the machine and scrape the sides to get the remaining batter/dough off the sides of the bowl. This beater blade fits snugly into the bowl and more efficiently and quickly stirs your ingredients together.
There are several beater blades available, depending on your size of KitchenAid. This one is for the 4.5 and 5 quart tilt-head stand mixer. Here's how to know if you need this blade if you are not sure if your mixer is the 4.5/ 5 quart size or larger.
And, the best thing is, that like the majority of my favorite things, it is under $30! You can find this at Amazon for $19.99 and, as an Amazon Prime Member, free two day shipping!
There is also a beater blade available for the larger mixers (5 and 6 quart size) that runs $27.95, and also includes a prime shipping option for Prime Members. Still a pretty good deal!
Here are the measurements for the larger mixer to determine if you need this larger blade:
Order today and you can get it by Monday, February 13th! Plus, this is just a great tool to have in the kitchen if you use your mixer on a regular basis!
Tuesday, February 7, 2012
Intentional Downtime; It's Worth It!
So, how do we escape this dance with efficiency and perfection and performance and still keep our life running (fairly) smoothly? Sometimes, it's by slowing down... just a little....to say hello to a stranger, to look up from our twitter account, email, spreadsheet, to make eye contact with another human being that is right in front of us! To ask them how their day is going instead of being so absorbed in what's next on my to do list. Sometimes, it's by taking a new route on the way to the store, to work, or to school in hopes of seeing something "different" that day. It could be by NOT cramming ACTIVITY into EVERY minute of your day, but by sitting still and allowing some moments to be created.
And other times, it is by INTENTIONALLY carving out time to get outside our every day life and spend time in those places that have not been "arranged by the hand of man"...This is where I regroup the best. When things are overwhelming or starting to get to me, the solitude is very healing for my spirit.
One of my favorite things to do is to go to an OUTSIDE venue and do a workout in my vibram five fingers, which I LOVE! There is nothing better than moving and exercising outside in the sunshine, wind, rain, etc...whatever the weather, I'm headed out...I even love it when I am visiting in Amarillo and it's cold! Unless there is SNOW on the ground and it's fffreezing, I prefer to workout outside any day.
Here's one of my favorite outside moments when I was in Colorado visiting my friend Maria. I love to photograph my excursions in my vibram five fingers..a little goofy, yes, but still something I enjoy!
Her neighbor, Monique, generously invited us to Winter Park to stay in her cabin for a night while I was visiting. It was peak time for color in Colorado, and what a perfect time it was for me to get away.With my dad passing away in the spring, and my sister and I in the middle of selling their home and conducting an estate sale, I was fortunate enough to find a $60 round trip flight from Amarillo to Denver. I snapped it up and flew to the mountains...my heaven here on earth!
Once in WP, the three of us took off for a walk among the beautiful changing aspen trees. I recorded the leaves blowing in the wind for my mom, who is an artist and who is now in a memory care unit, because she always said they looked like coins blowing in the wind. That was a gift I could take back for her.
The colors, the untouched nature around me, was such a healing place for my spirit to be in the winding down of what had been a very chaotic year. I was presented with an amazing opportunity (who gets to FLY to Denver for $60?!?!) AND stay in an amazing place with two very special friends. But, I had to INTENTIONALLY seize that opportunity. I admit, I don't always make the most of these moments, but this time I did, and my spirits were changed in three days. I am so grateful for the BEAUTY of this world, and this opportunity to be plunked down in the middle of it, even for a brief time. And for the friends who were there alongside me.
The challenge? Look for places "not arranged by man" to scoot off to...even for 15 or 20 minutes. A local park? A trail for walking? A new route on your road bike? A drive in the country on your own with the windows down and listening to "your" music. I encourage you to take time. Make time. To let your human spirit soar alongside the natural beauty around you. And in the words of my friend, Charlia, "It's good for your soul". And she's right. It is.
Subscribe to:
Posts (Atom)